Thursday, January 12, 2012

New Regency look using Ackermann Repository images for my Main Blog - EKDuncan

I decided to to update my main blog www.EKDuncan.blogspot.com for 2012 by changing a few things about it.  I've got a new background, an updated title, a new banner, changed my profile picture and even created a blog button to be grabbed.  A good start to a new and wonderful year!

New Look for my main blog - www.EKDuncan.blogspot.com
  I originally had an extend title on the banner that was EKDuncan - My Fanciful Art Quest.
Now the new banner title is EKDuncan "My Fanciful Muse"

So, why the change?
 I decided that going forward I wanted these two blogs to tie in better and thought this would 
be the best way to do it since this sister blog is www.MyFancifulMuse.blogspot.com.
This way the sister blog name plays a prominent role on the banner of my main blog too. 

I've not posted a lot in the past here, to this blog;
so my hope is that going forward I will use it more.

For example on my main blog I've been posting a series of Regency era pieces
tied to the 1809-1828 publication Ackermann's Repository.
I've been posting images from those publications for the past 6 months.
I never expected to spend so much time on that series but it has become a labor of love.

 I did not want to break the rhythm of the sequence of those posts so on occasion
I placed a few non-sequential or non-Ackermann projects here to this sister blog.

Yesterday I decided to let the two sites become more strongly linked together
- so we'll just see how it all goes.


I like the new changes I've made and I hope you guys do too.
 These are the new digital designs I created for the main blog www.EKDuncan.blogspot.com 

New blog Banner with updated title - EKDuncan "My Fanciful Muse" instead of the old EKDuncan - My Fanciful Art Quest
I think this is a big improvement over the old banner - see HERE at the bottom of the post.
I could not resist adding a few more Ackermann images to the mix.

New blog button for
www.EKDuncan.blogspot.com
My first ever blog button creation.


My closing tag line to every EKDuncan post is "Grins and Giggles"
I even created a new graphic to close all my posts with.

All the images used to create the above items are from
Ackermann's Repository a 200 year old Regency Publication from England.


These are the individual images I used.


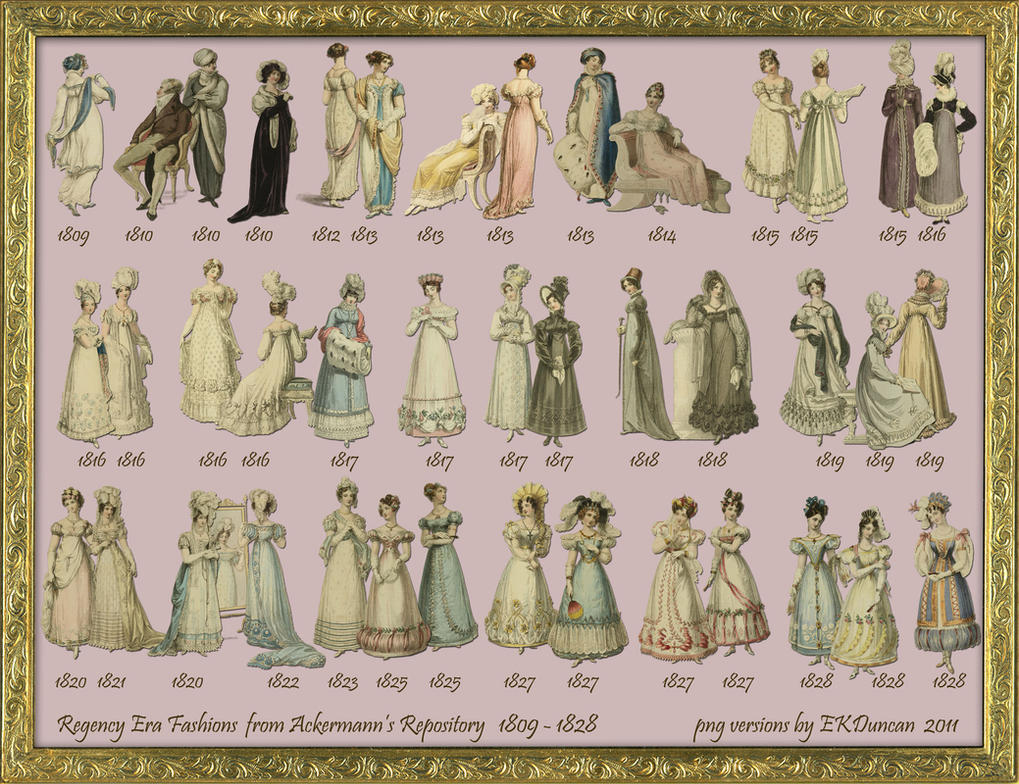
The Fashion Ladies of Ackermann Repository

Ackermann's printed 2 fashion plates in each of it's monthly issues from 1809-1828.
There were hundreds of hand-colored plates in the 20 years of publication.
Many of my favorites were Ball, Evening, Court and Traveling Dresses.


  I took several of my favorite Regency fashion plates and created png images
so they could easily be used in digital art creations.
These were the just three I used for this project.


The 1809 Gentleman and the Lady at the Mirror from my blog background can also be found
in the below zip file with the 41 png Regency Fashion Plates from Ackermann's repository.
I've created 41 of them into an easy to download zip file
that can be found on my deviantART account HERE

 To see more posts about Ackermann Repository Fashions
from 1809-1828 click HERE or see the below links.


All the Ackermann Repository Fashion plates for the 20 years
of publication can be found on the below links.

I created 1 post for each years fashions and then
I created some fun artwork using a variety of Ackermann images.
I hope you enjoy them.

 Ackermann's ran series 1 from 1809 - 1815
(this is a fun digital art piece I did using many of the above ladies)

Ackermann's ran series 2 from 1816 - 1822
(this is a fun digital art piece I did using several Ackermann's Repository images from 
series 2 and one fun lion man from J.J. Grandville, who was another Regency period illustrator.)

 
Ackermann's ran series 3 from 1823 - 1828
Ghost Ladies of the Regency
(A whimsical piece of artwork I created using several Ackermann's Repository images.)

Here are several links to EKDuncan digital scenes
I created using Ackermann Repository images.

Waiting for Midnight
Happy Christmas
Beautiful Day for a Walk
Regency Ladies with a Gothic View
Regency Ladies with a Curtain View
Regency Beauties - Set the Stage
Ladies in a Midnight Garden
Regency Ghost Scene


The Curtain
Ackermann's Repository posted a nice selection of curtains as part of its ongoing furniture series.

This is the version I used on my new blog banner for EKDuncan.blogspot
 To see all the amazing curtains from Ackermann's Repository - click HERE
My png versions of these Regency curtains can be found on my deviantART account  - HERE


The Landscapes

 There were many series in the pages of Ackermann's that included scenery;
some of my favorites were the "Garden" series & the "Country Seat" series.

I used this as a backdrop in my new blog banner - I reduced the opacity to make it more transparent.

I used this "Country Seat" on the left side of my blog background - behind the seated gentleman


I used this as a backdrop to my ending Grins and Giggles signature and
the un-altered version of the same image was used on the background for my blog
- behind the lady at the mirror.
This is actually my version of a digital scrapbooking background page.
I created a whole series of them - HERE

 Other "Garden" landscapes can be seen - HERE
Landscapes of "Country Estates" can be seen - HERE

I started posting images from Ackermann's Repository at the end of June 2011.
My first post was a deck of Regency Era Playing Cards  - click HERE to see the post.
And I've been posting Ackermann Repository images and articles for over 6 month
with several more posts to go before I'm done.
I'm currently posting Furniture Plates with the first of 3 in the series - HERE

I hope you will check some of these link out.
The images are beautiful and I've also included some of the original articles
and descriptions so you truly get the fell of what it was like to read a period Regency magazine.


Now that I've got my main blog looking nice and pretty for 2012;
 My next project is to do the same her on this sister blog site.

Might prove quite interesting.

Till next time.


Sunday, November 27, 2011

Christmas Fairy Ornament - Mulit Layered for Dimension

With Christmas just around the corner my Muse decided it was time 
I started making a few special ornaments for the tree.

My first 2011 Christmas Creation is a re-visit to one of my favorite
digital creations that I did much earlier in the year. 

She was so pretty I could not resist making her into a Christmas Fairy.

Christmas Fairy Ornament by EKDuncan 2011
This ornament was made using a piece or digital art I created using a variety of
PaperWhimsy images that was printed multiple time, cut into various layers
and stacked to give it a lot of dimension.
(sorry - the photos just don't show it very well)


A side-view photo trying to capture the stacked layers
I've taken several pictures of it trying to show the dimension all the layers gives this piece 
but the photos just can't seem to capture it very well; so I hope you can get a better idea 
of it by seeing how she was created.


The Original EKDuncan digital art piece - Queen of the Spring Fairies
I started with this original EKDuncan digital image I created 
HERE in March of 2011 on my main blog.

All the images used to create the fairy above are from PaperWhimsy and the 
instructions for her creation can be seen by clicking the above link.


This is what my project cutting sheet looked like.
1 Background - 6 Fairies and 1 Spare, just in case.
 I stared by flipping the images so my Christmas Fairy images are in the 
opposite direction of my original St. Patrick's Day Fairy images.

I sized everything and altered the shape a bit so it would work with the Tim Holtz die set 
(Movers & Shapers - Baroque and Mini Baroque - Sizzix dies) 
I would be using to create my finished ornament.


6 Fairy images were needed to crate the layered look I was going for.
I printed 6 Fairies and one spare in case she was needed; then cut the image out in
various sections so I would get the finished layered look I was going for.

The top left image was the bottom most layer and the then the last image
of just the Fairy torso was the top most layer.  


Sponging brown ink on the cut, side edges of each layer.
 I sponged brown ink on the raw cut edges of all the layers so the white paper did not
stand out and create a hard edge on the sides of all the layers when assembled.


The Layered Fairy
Very thin "pop dots" were used between the layers so each would of the layers
would be slightly raised off the ones below it.

It took a bit of planing to figure out which items needed to be raised and where. 
For example: I wanted the wings to sit back a bit but not be flat with the bottom layer
this is why only the middle two layers have wings.


Another view of the layered skirt
 On her skirt, I wanted the most raised portion to be the the first long side panel. 

Notice on the first 3 cut images - (*see the 6 cut out fairy parts further above)
the skirt is full except for the "inside" areas I've been cutting away
so you can peek down to the lower layers when she is assembled.
Then on the *4th and *5th image I've cut away the last "outer" skirt portion
along with continuing to cut away at the inside portions.

This creates a raised frame effect to both the inside and far outside portion
of the skirt once all the layers are in place, for some added interest.


The finished layered Christmas Fairy Ornament
After the layered fairy was complete; it was time to set her in the ornament.


Tim Holtz Movers & Shapers die cuts by Sizzix
 I love the thick dies Tim Holtz designed for Sizzix and this set is one of my favorite.
The Baroque die cuts the back of the ornament and then by using the
Baroque and Mini Baroque dies together you get the frame portion with the center cut out.
(I did two of these - the black one creates a spacer in between the back and front of the ornament)

Even though I used thick mat board to create my ornament; the "layers" on the fairy made her
so thick that a spacer was needed so she sat properly in the ornament.


(Tip - I found it easiest to clue my decorative paper onto the mat board
before cutting the elements out with my Big Kick machine.)

The first image shows the "Back of the Ornament" as you would see it once the
ornament is put together; but on the flip side of that piece is the "background"
you see behind the Fairy in the finished piece.


This is what she looks like after I added the finishing touches.
I could not resist putting her on my tree to take the final picture.

She will be a gift to a very special person this year; but
I might just have to make another one so I can have one too. - giggles.


 Happy Holidays!
 Evelyn


To see the Christmas ornaments I created for my EKDuncan blog last year
click HERE and HERE


Saturday, July 9, 2011

New Look for My Blogs using Regency Beauties from Ackermann's Repository

I updated the look of my blog page to celebrate my finding an amazing assortment of 
Regency Era images in the pages of Ackermann's Repository.  

I will blog a bit about it here on this my "Muse" blog and also there will be lots 
of images posted on my main blog http://ekduncan.blogspot.com/


This is my favorite image out of all the Ackermann's Repository fashion plates.


And this was another favorite in a similar colored gown.
I used her on my "Muse" blog with the first lady.


I used this Gentleman (flipped) on my main EKDuncan blog along with 
the Lady looking in the Mirror.  I wanted both blogs to look similar but not 
exactly alike, so there are slight differences.
Click HERE to see what his original image looked like before I removed his background.

The Original Ackermann's Repository fashion plates had to have their backgrounds
removed so that the ladies and gent, stood out on their own.  
Now I have several great png images that can be used in a variety of way.


I created the background pattern in Photoshop. 
I love multi-colored patterns and this marbling effect reminded me of the inside
covers you find in antique books, so for me it tied in that Regency feel.

 
Put them all together...
 This is the new look for my "Muse" blog
It has a greenish blue tone with two Regency Ladies.
 
(update - several months later I removed the two ladies and just used the marbled background)

This is what My Fanciful Muse blog background looked like  after I removed the ladies
 I just thought the simpler cleaner look worked better for this lower-key blog


 and this is the new look for my main "EKDuncan" blog
It has a more Blue Gray look with a Regency gent looking at his lady.


 I even created a new "Title Topper" for my EKDuncan blog
using an Ackermann's Repository Curtain
(I changed the color of the original to make it work for my application)


I'm currently in the process of posting more of these amazing 
vintage images from Ackermann's Repository over on my main blog page 
so pop on over and check them out.


Have a Creative Day - Evelyn

Friday, July 8, 2011

Amazing Images from the pages of Ackermann's Repository

I've been fortunate to have discovered a treasure trove of 200 year old Regency images in the pages of an old British publication called Ackermann's Repository.  There are fashion plates, furniture pieces, curtains, houses, buildings, scenery and more... Oh, it's been so much fun to browse through all 20 years of the publication. (1809 - 1829)

I'm currently in the process of saving these amazing images to my computer and will be posting them on my main blog  http://www.ekduncan.blogspot.com/ all summer long.  I'm starting with the fashion plates, then will do curtains, furniture and finally some of the scenes, buildings and manor houses; to give well rounded examples of what Ackermann's was all about.  Oh, and they also published needlework patterns, so I'll be get around to publishing those too just for the grins and giggles of it.


Example of an Ackermann's Repository Fashion Plate
 Not only are the fashions lovely but the faces are so sweet; 
making the Ackermann' fashion plates some of the best from this time period.


Example of an Ackermann's Repository Furniture Plate
The Ackermann's furniture plates sometimes showed just a single piece of furniture, 
a set of furniture, a window treatment or like this example a room or partial room.
(by using a digital editing program this partial room can become a whole scene)
Click HERE for previous post on how this image was used to create a room


Example of one of the many extras found in the pages of Ackermann's Repository
Ackermann's Repository would introduce a "series" and continue it on for several issues.  They spent a few years showing a fancy deck of pictorial playing cards and in several issues they showed phaetons and carriages.  Since the publication was for both ladies and gentleman, they needed to depict items that would be appealing to both sexes in it's pages.


Example of Places, Building or Scenery found in Ackermann's Repository
 Ackermann's Repository has wonder full colored plates of scenery all through its issues.  They constantly had some series going that included places, buildings and scenery of all types. They had a series' called "Views of London"  & "Country Seats".
One year they showed all the Churches and public buildings in London.  There are scenes of gardens, public parks and various streets and neighborhoods from all over London in the pages of Ackermann's Repository. 

I found these types of scenes to be fascinating.  
I read a lot of Regency romances and now I have a much better idea 
how certain places in and around London looked during this time period.


Example of Needlework Patterns from Ackermann's Repository
Many of the Ackermann's repository issues had a decorative pattern in them.
They are not in every issue but fairly close.  Sometimes they had patterns for 
painting or inlay work; however most of them are needlework patterns 
like this one from one of their last issues.


Too see more great images from Ackermann's Repository
keep checking my main blog at

I'm currently in the process of listing all the fashion plates Ackermann's Repository 
published in its 20 year run; then I'll start listing other great images from it's pages.

Once all those images have been posted;
I'll show how the various images can be altered 
in Photoshop to create fun new digital scenes that are reminiscent of old "toy theaters"


Thanks for dropping by 
- Evelyn

Thursday, July 7, 2011

Create a Room - Regency era image - Ackermann's Repository

I've found and fell in love with images from the Regency Era publication 
Ackermann's Repository.

My fanciful muse has been stirred into motion to save images from it's pages
and then create digital art with them.
I love the idea of giving new creative life to these 200 year old images.

I've previously posted about my love of "Toy Theaters" and 
creating digital artwork that has a similar look.

I have been hunting for antique curtain designs for a long time and in the process
of my search I was fortunate enough to discover Ackermann's Repository and their
huge quantity of images including rooms, furniture and yes... curtains.


A room I created digitally using a partial Ackermann's image - "New Room"
 Here is an example of a room I created digitally using a partial image 
I found in Ackermann's Repository. 

I duplicated the original image, flipped it to create a mirror image, merged the two 
and did some clean up to blend them together.

Now I have a simple room that I can use as a base and add other elements to 
and create a fun Regency style scene.


This is the original Ackermann's image - partial room


By taking the above "new room" and continuing the digital mirroring process 
I have another expanded look for my room.
I expanded the new room by continuing the mirroring process in Photoshop
I enjoy manipulating images in Photoshop to see what new combinations I can achieve.
Here is what my new room expansion looks like after I continued the mirroring process
using the original curtain portion of the room.


And if I don't like the original color of the room...
I can change that too!

Peach and Coral version

Pink Version

Brown and Gold Version

Black and Gold Version

Blue and Gray Version

My Muse likes to play with color changes, so I could keep doing this for days 
but I'll stop here since I know you get the point.

So, this is just a bit of fun I'm having with my newly discovered 
Regency images from Ackermann's Repository.


If you are like me and can't get enough of them...

I'll be posting and blogging about these finds for the whole summer, 
and maybe longer since there is so many wonderful images to share.
So visit my main blog over at http://www.ekduncan.blogspot.com/
to see all the great images from the pages of Ackermann's Repository.


Thanks for dropping in and seeing what my Muse has taken a fancy to this time.
- Evelyn

Saturday, April 2, 2011

I Created a New Background for my EKDuncan.blogspot Account

I bought a mini laptop so I could create when I'm away from home and decided it was time to change the look of my main blog account  ekduncan.blogspot.com.  So, I choose to create a less busy background that could easily be seen on a variety of screen sizes without looking chopped off.


Since I made a simple background I thought I needed a dressier Title
and created this to go with it.
A few fun fonts, A lovely lady and a great frame to finish it off.

 
I created this as my latest ekduncan.blogspot.com background


I liked the way all the elements worked together and think it has a bit of a Western Victorian look to it when it's all pulled together on the same page.
 

I used this lovely Victorian paper scrap image as the lady in my title.  
She was originally Pink but I changed her color
to better match my new background design.


This is what the image originally looked like before I changed her
gowns color and flipped her in the other direction.


*******


Prior to this change my ekduncan.blogspot.com account had a
background similar to the one here at
"My Fanciful Muse" blog account but in a periwinkle. 
This is what my old ekduncan.blogspot.com background looked like.
I liked the colors and the central portion of the background so I started
with those as a foundation to build my new background from.


I'm sure as my Photoshop skills advance I'll keep creating and changing the background here and on my main blog account, so I'll keep posting the changes here as a journal for that creative  journey.


Ta Ta Till Next Time
 Evelyn